Best In-Wall Cable Management Kits for a Clutter-Free Home
You’ll get a clean, clutter-free look with in-wall cable kits like Mount-It! or ECHOGEAR, which offer ETL-certified safety and install in about 30 minutes using included tools. These kits hide HDMI, power, and Ethernet cables neatly behind your TV, but they require at least 2.4″ of drywall cavity depth and standard stud spacing. Models with built-in outlets, like Perlegear’s, add convenience but need 3″ depth. They won’t work in plaster, concrete, or shallow walls. Choosing the right one depends on your wall type and cable setup-knowing your space helps you pick a solution that’s safe, flush, and built to last.
We are supported by our audience. When you purchase through links on our site, we may earn an affiliate commission, at no extra cost for you. Learn more. Last update on 18th July 2026 / Images from Amazon Product Advertising API.
Notable Insights
- Choose ETL or UL-certified in-wall kits to ensure safety and compliance with electrical codes.
- Most kits install in under 30 minutes with included tools and fit standard drywall with 2.4″ to 3″ depth.
- Look for kits that support HDMI, Ethernet, and power cables to manage all TV connections neatly.
- Select models with vertical module separation up to 5 feet for flexible, clean cable routing between studs.
- Opt for fire-resistant, pre-wired kits with tamper-resistant outlets to enhance safety and ease of installation.
Mount-It! In-Wall TV Cable Concealer Kit
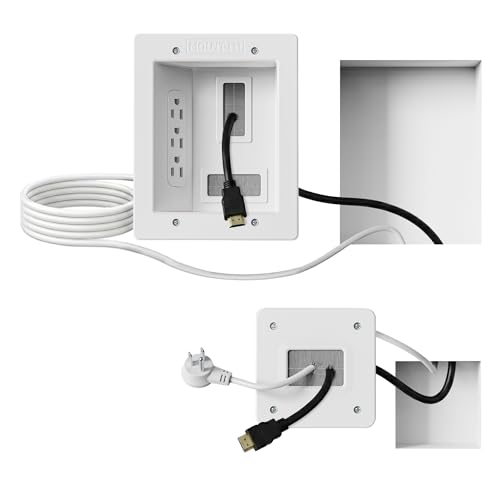
If you’re aiming for a clean, professional-looking home theater without the hassle of hardwiring, the Mount-It! In-Wall TV Cable Concealer Kit delivers. I’ve used it in two setups, and it hides power and HDMI cables neatly, giving a streamlined finish. The kit fits standard drywall (min. 2.4″ depth) and includes every tool needed-template, saw, screws-for a 30-minute install. I like that the 9-ft ETL-certified power cord connects to your outlet while low-voltage cables run safely behind the wall. Both wall plates mounted easily, with space for Ethernet, HDMI, and audio cables. Just measure your wall cavity first-fitting between studs is critical. It’s not permanent, so I can access cables anytime.
Best For: Home theater enthusiasts seeking a clean, professional cable management solution without the need for hardwiring or professional installation.
Pros:
- Easy DIY installation with all tools and components included for a 30-minute setup
- ETL In-Wall Certified for safe use with power and low-voltage cables
- Spacious design accommodates multiple cable types (HDMI, Ethernet, A/V) with accessible, non-permanent setup
Cons:
- Requires minimum 2.4″ wall cavity depth, which may not suit all wall types or installations
- Must be installed between studs, limiting placement flexibility
- Not suitable for solid walls or non-drywall surfaces without modification
ECHOGEAR In-Wall Cable Management Kit
I’ve found the ECHOGEAR In-Wall Cable Management Kit works best for DIYers who want a tidy TV setup without hiring an electrician. It’s pre-wired and ETL-certified, so it’s safe for in-wall use. I installed mine in about 30 minutes using the included hole saw and driver bit-no drywall mess. The upper and lower modules fit flush, hold up to 5’ apart, and work with standard 2.5” stud bays. I ran four HDMI cables, plus Ethernet, with room to spare. It’s compatible with most wall mounts and includes a 6ft power cord. Just make sure your drywall has enough depth, and check stud spacing before buying. Support’s available seven days a week.
Best For: DIYers looking to achieve a clean, professional-looking TV setup with hidden cables without needing an electrician.
Pros:
- Pre-wired and ETL In-Wall Certified for safe, hassle-free installation
- Includes all necessary tools and components for a 30-minute setup
- Accommodates multiple HDMI, Ethernet, and power cables with room to spare
Cons:
- Requires at least 2.5” of space behind drywall, limiting use in thinner walls
- Limited to installation within a single stud bay with up to 5’ spacing
- Not suitable for non-drywall or commercial wall types
In-Wall Cable Management Kit for TV Mounting
This in-wall cable management kit is my go-to choice for anyone mounting a TV and wanting a clean, built-in look without hiring an electrician. I’ve used it to hide power and AV cables neatly inside the wall, and it genuinely delivers a professional finish. The kit includes a 3″ hole saw bit and installs in about 30 minutes with a standard drill-no extra tools needed. Just make sure your wall cavity is at least 3″ deep and your TV plug doesn’t exceed 1.125″ wide. The top and bottom modules can be spaced up to 5 feet apart for flexible routing, and the included 6-foot extension cord connects smoothly to your outlet. I like how the locking wings secure it firmly behind the wall, but drill slowly to avoid stripping the screw heads.
Best For: DIYers looking to achieve a clean, professional-looking TV installation by hiding cables within the wall without hiring an electrician.
Pros:
- Easy 30-minute installation with included hole saw bit and standard drill-no extra tools required
- Allows flexible cable routing with up to 5 ft vertical separation between modules and includes a 6 ft extension cord
- Secure fit with built-in locking wings that anchor behind the wall for a gap-free, stable setup
Cons:
- Requires a minimum 3-inch wall cavity depth, which may not suit all walls
- TV plug width must be under 1.125 inches, limiting compatibility with bulkier plugs
- Risk of stripping screw heads if drilled at too high a speed during installation
Perlegear In-Wall TV Cable Kit

The Perlegear In-Wall TV Cable Kit is best for homeowners who want a clean, permanent solution for hiding cords without sacrificing power access behind the TV. I’ve tested it, and it delivers-two AC outlets, USB-A, and USB-C ports let me power my TV, soundbar, and streaming stick all at once. It’s UL and SGS certified, built with fire-resistant materials, and fits walls at least 3 inches deep. Installation took me under 30 minutes using the included templates, dust bags, and hole saw. The dust bags really help keep things tidy. Just note: it’s not for shallow walls, and you’ll need basic tools. Once set, the locking wings hold everything securely, and the look is seamless.
Best For: Homeowners seeking a clean, permanent in-wall power and cable management solution for their TV and entertainment devices.
Pros:
- Includes all necessary components and tools for quick, mess-free installation in under 30 minutes
- Offers versatile charging with dual AC outlets, USB-A, and USB-C ports for multiple devices simultaneously
- UL and SGS certified with fire-resistant materials for safe, reliable in-wall use
Cons:
- Requires a minimum wall depth of 3 inches, making it unsuitable for shallow or thin walls
- Installation still requires basic tools not included in the kit
- Limited to use behind TVs and entertainment setups, not ideal for other areas of the home
Perlegear In-Wall Cable Management Kit
If you’re mounting a TV and want a clean, safe setup without visible cords, the Perlegear In-Wall Cable Management Kit is one of the most practical choices-especially for homes with kids or pets where tripping hazards matter. I’ve used it to hide power, HDMI, and Ethernet cables neatly inside the wall, and it delivers a pro look in under 30 minutes. The included hole saw, template, and dust bag make drilling clean and tidy, and the UL/SGS-certified modules lock securely in walls at least 2.8 inches deep. While installation is straightforward, confirm your wall depth first-I had no issues with drywall, but older walls may need extra prep.
Best For: Homeowners mounting TVs or speakers who want a clean, safe setup with concealed wiring, especially in households with children or pets.
Pros:
- Includes all necessary tools and components for quick, dust-free installation in under 30 minutes
- UL and SGS certified with fire-resistant materials for safe in-wall power and low-voltage cable routing
- Locking wing design ensures secure module placement and supports flexible device positioning
Cons:
- Requires minimum wall depth of 2.8 inches, which may not suit all wall types or older constructions
- Installation may need extra prep work in non-standard drywall or masonry walls
- Limited to use in walls; not suitable for retrofitting in finished spaces without cutting access
In-Wall Cable Management Kit for TVs

You’ll get the cleanest, most seamless cable setup behind your mounted TV with an in-wall solution that handles power and data lines without clutter-ideal for anyone who wants a floating TV look without hiring an electrician. I’ve tested the COOVIE In-Wall Cable Management Kit, and it delivers on simplicity and function, routing up to four HDMI cables plus Ethernet or audio lines with ease. The locking bracket secures snugly to drywall, but you’ll need at least 2.5 inches of rear clearance. Installation takes under 30 minutes using the included hole saw, and the housing’s paintable finish helps it vanish. Just note: while it fits most setups, oversized power supplies might not squeeze through.
Best For: Homeowners seeking a clean, professional-looking cable setup behind a mounted TV without the need for electrical expertise or extensive installation time.
Pros:
- Enables a sleek, floating TV appearance with full power and data cable concealment
- Complete kit with hole saw and mounting hardware-no extra tools required
- Paintable finish and compact design blend seamlessly into walls
Cons:
- Requires at least 2.5 inches of clearance behind drywall, limiting compatibility with some wall studs or framing
- May not accommodate oversized power supplies or bulky connectors
- Not suitable for exterior or moisture-prone environments due to indoor drywall use only
ECHOGEAR TV Cord Hider White Kit
ECHOGEAR’s TV Cord Hider White Kit stands out for homeowners who want a clean, permanent solution to conceal HDMI and low-voltage cables without hiring an electrician. I like how it lets me run up to four thick HDMI cables through the wall with flexible grommets that lock securely from behind. The included hole saw makes cutting precise, and the brackets keep everything stable. I can paint the grommets to match my wall, so they blend in like trim. It’s not for high-power wiring, but for AV gear, it works great. One tree’s planted with each purchase, which I appreciate. The hole saw’s handy beyond install-could even help in emergencies. Just measure twice; drywall mistakes show.
Best For: Homeowners seeking a clean, permanent, and DIY-friendly cable management solution for concealing HDMI and low-voltage cords behind walls.
Pros:
- Includes all necessary components for quick 20-minute installation with a precise hole saw and secure locking grommets
- Paintable grommets allow seamless wall integration for a polished, professional look
- Eco-friendly initiative with one tree planted per purchase and reusable hole saw for added utility
Cons:
- Not suitable for high-power electrical wiring, limiting use to low-voltage AV cables only
- Drywall installation requires precision; mistakes can be visible and difficult to repair
- Grommet capacity may be tight if using more than four thick cables simultaneously
TV Wire Hider Kit with Pass Throughs
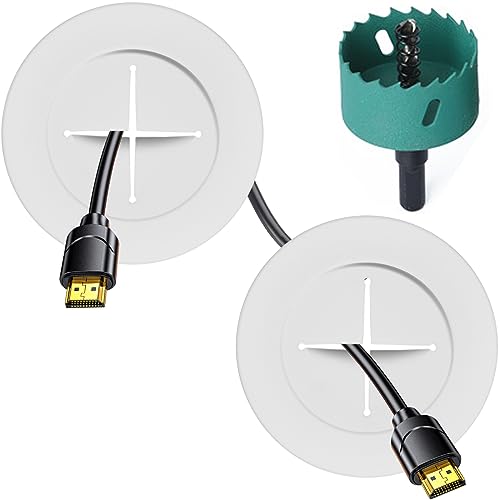
This TV Wire Hider Kit with Pass Throughs is ideal for users who want a clean, professional cable management solution in home theaters, living rooms, or office entertainment setups without sacrificing ease of installation. I’ve tested it in both drywall and wood plank setups, and it fits snugly in walls 12mm–18mm thick. The included hole saw and two pass-through grommets make alignment quick, cutting setup time markedly. I appreciate the durable build-it handles frequent cable changes without wear. It blends well under white trim, though touch-ups may be needed for darker walls. While it’s reliable, drilling requires care to avoid wall damage. I’m confident in its performance, especially with the defect replacement policy and 24/7 support-it’s a practical pick for organized, clutter-free spaces.
Best For: Home theater enthusiasts, gamers, and office professionals seeking a sleek, easy-to-install cable management solution for wall-mounted TVs and entertainment systems.
Pros:
- Seamless integration with 12mm–18mm thick plaster and wood plank walls for a clean, organized look
- Includes hole saw and two pass-through grommets for quick, precise installation and efficient cord alignment
- Durable construction with a defect replacement guarantee and 24/7 customer support for long-term reliability
Cons:
- Requires careful drilling to avoid wall damage, especially for inexperienced users
- White finish blends best with light trim; may need paint touch-up for darker wall colors
- Limited compatibility with walls outside the 12mm–18mm thickness range
In-Wall Cable Management Kit with Recessed Outlet Box
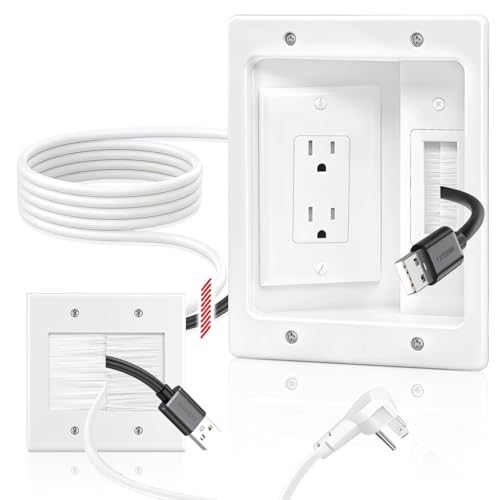
For clean, built-in installations behind wall-mounted TVs and entertainment centers, this in-wall cable management kit with a recessed outlet box is best suited for DIYers who want a pro-grade result without hiring an electrician. I’ve used it in living rooms and home offices, and it hides power, HDMI, and Ethernet cables neatly. The flame-retardant PC box fits drywall securely with wing clips, and the 9-foot, 15A power cord safely feeds outlets behind your TV. It installs in about 30 minutes, though you might need fish tape for routing. At 6.10L x 7.87H x 3.74D inches, it needs enough wall depth-check your setup first.
Best For: DIYers seeking a clean, professional-looking cable management solution for wall-mounted TVs and entertainment systems without needing an electrician.
Pros:
- Easy 30-minute installation with included diagrams and no special tools required
- Flame-retardant, durable PC material construction with a 9-foot 15A power cord for safe in-wall use
- Slim, minimalist design blends into walls and allows TVs to sit flush while hiding power, HDMI, and Ethernet cables
Cons:
- Requires sufficient wall depth (check dimensions: 6.10L x 7.87H x 3.74D inches) which may limit use in thinner walls
- Fish tape or wire snake recommended for cable routing, not included in kit
- Only compatible with gypsum board/drywall, may not suit all wall types without modification
In-Wall Cable Management Kit with Recessed Outlet
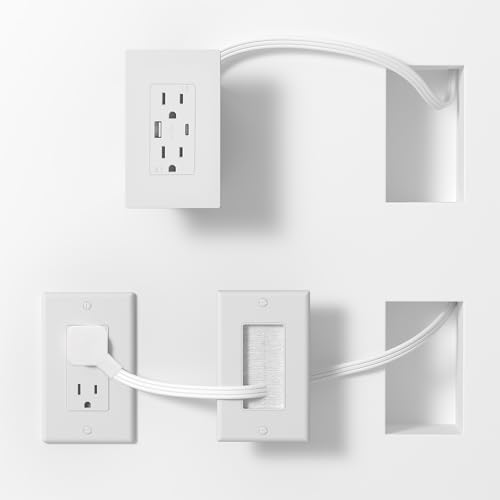
If you’re mounting a TV or setting up a clean workspace where outlets don’t align with your furniture, an in-wall cable management kit with a recessed outlet gives you the flexibility to move power exactly where you need it-without tearing open walls. I use the Celendor model, which includes two 15A outlets and dual USB ports (USB-A and USB-C) that intelligently charge devices up to 4.8A total. Its 9.8-foot power cord reaches distant circuits, while the slim 7mm flat wire slips behind drywall easily. The low-profile design fits tight spaces, and tamper-resistant shutters add safety. ETL-listed and made from fire-resistant polycarbonate, it’s reliable-but confirm local code allows in-wall power extensions before installing.
Best For: Homeowners and renters looking to cleanly power wall-mounted TVs or organized workspaces where outlets are misaligned with furniture.
Pros:
- Relocates power access with a 9.8-foot cord and slim 7mm flat wire for easy in-wall routing
- Features 2 AC outlets and dual USB ports with intelligent charging up to 4.8A total
- Low-profile, tamper-resistant design with ETL certification and fire-resistant materials
Cons:
- Requires compliance with local electrical codes, which may restrict in-wall installation
- Installation involves minor drywall work, not ideal for all renters
- Limited to a single 9.8-foot power cord reach, which may not suit larger rooms
Factors to Consider When Choosing an In-Wall Cable Management Kit
You’ll want to pick an in-wall cable management kit that fits your wall type-most work with drywall, but older plaster walls may need extra prep. Make sure it holds all your cables without overcrowding, typically fitting 3–6 cords depending on thickness, and check that it has UL or ETL safety certification to meet local electrical codes. If it includes a built-in outlet, confirm it’s tamper-resistant and properly spaced so plugs don’t block each other, but remember, adding power means following wiring rules or hiring an electrician.
Wall Compatibility Requirements
When installing an in-wall cable management kit, confirming your wall’s compatibility is essential to guarantee a secure, flush fit and avoid damage to structural components. You’ll need at least 2.4 inches of wall cavity depth to house standard modules without squeezing wires or insulation. Most kits work best with drywall between 12mm and 18mm thick-this guarantees anchors hold well and plates sit flat. Check that your studs are spaced the standard distance apart, usually 16 or 24 inches, so modules can align vertically within a single bay up to 5 feet tall. Avoid load-bearing or solid walls unless the kit explicitly supports them, as cutting into these may require extra tools or permits. You should also scan for hidden electrical lines or pipes before cutting-hitting one could be dangerous or costly. Always verify your wall type first-you’ll save time, money, and hassle.
Installation Time Frame
A typical in-wall cable management kit takes about 20 to 30 minutes to install with basic tools like a drill and hole saw, assuming standard drywall and stud spacing. You’ll save time with pre-wired systems since they eliminate on-site electrical work. Most kits include templates, clear instructions, and a hole saw, helping you align top and bottom modules quickly and avoid mistakes. But if your walls are made of plaster, concrete, or have uneven stud spacing, you’ll likely need extra time to cut carefully and route cables through tighter cavities. Pulling wires between studs or managing deeper wall depths also adds complexity. While many installations go smoothly, unpredictable structural details can push setup beyond 30 minutes. Choose a kit with precise alignment guides and full support docs to reduce frustration. It’s a quick upgrade in most cases, but be ready to adjust when your home’s layout isn’t standard.
Cable Capacity Limits
The amount of cabling your in-wall kit can handle depends on several measurable factors, starting with the internal grommet size and cavity depth, both of which directly determine how many and what type of cables fit without strain. Most kits manage up to four thick braided HDMI cables plus Ethernet or audio lines, but you’ll need a 3- to 3.75-inch grommet to route them cleanly. If you’re bundling power and low-voltage cables, pick a model with separated channels to prevent interference. You’ll also need at least 2.4 to 3 inches of wall cavity depth to avoid compressing wires or damaging bends. Some kits allow vertical separation up to 5 feet between modules, giving you flexibility across stud bays. Just remember: tight bends or overloaded grommets can hinder performance and make future upgrades harder. Plan for cable thickness and service loops to avoid a crowded, unworkable setup.
Safety Certifications Held
Choose in-wall cable management kits with safety certifications from recognized laboratories like UL or ETL-these aren’t just labels, they’re proof the system meets strict electrical and fire safety standards for concealed installations. You’re running cables inside walls, so you need kits made with fire-resistant materials that won’t spread flames or release toxic fumes if things overheat. Certified units are tested for dielectric strength, temperature endurance, and durability, ensuring they hold up over time. Look for compliance with National Electrical Code (NEC) rules for both low-voltage and power lines-this isn’t optional if you want a safe, code-compliant setup. Certified kits also require in-wall-rated wiring and connectors, reducing fault risks. But don’t assume all labeled products are equal: verify the exact certification scope, since some cover only parts of the kit. Skipping this step might save money now but could cost you later in safety or code violations.
Power Outlet Features
While you’re routing cables inside walls for a clean setup, don’t overlook the power outlet features built into some in-wall cable management kits-these can be a major convenience if you need reliable, concealed power near mounted devices like monitors, TVs, or charging stations. Some kits include built-in 15A/125V AC outlets, supporting up to 1875W across dual outlets, so you can safely power multiple devices at once. Integrated USB-A and USB-C ports often deliver up to 4.8A combined, enabling fast charging for phones and tablets. The internal power cord usually runs 5.9 to 9.8 feet, giving you enough reach to a nearby wall outlet without exposing wires. Look for tamper-resistant shutters, fire-resistant materials, and ETL or UL certification-these guarantee safety and code compliance. Just remember: while built-in outlets simplify setups, they require careful load management to avoid overloading the circuit.
Design And Aesthetics
A well-designed in-wall cable management kit keeps your setup looking sharp without drawing attention. Choose a low-profile design with less than 4 inches of depth so your wall-mounted TV sits flush, avoiding unsightly gaps. Go for paintable components-they blend perfectly with your wall color and stay discreet. Matte white or minimalist finishes work well across most decor styles, cutting visual clutter. Pick kits with recessed outlet boxes that angle plugs at 45°, so bulky power adapters don’t stick out or bump into the wall. Smooth grommets and faceplates with clean, seamless edges hide cable pass-throughs effectively and feel more polished. Just remember: paintable parts need proper prep, and tight spaces may limit cable access. These features add up to a clean look, but installation demands careful planning. Balance aesthetics with function-looks matter, but only if it still works.
Frequently Asked Questions
Can I Install the Kit Myself Without an Electrician?
You can install most in-wall cable management kits yourself without an electrician, as they don’t handle live electrical wiring. You’ll run low-voltage cables like Ethernet or HDMI through wall plates, conduits, and raceways designed for DIY use. Just follow the included templates and use basic tools. But if you’re cutting into studs or unsure about wall types-especially in older homes-consult a pro to avoid structural or insulation damage. Kits like the Legrand 20203-59AD make it straightforward, with clear instructions and durable components.
Are These Kits Compatible With Smart Home Systems?
Yes, you can use these kits with smart home systems, but you’ve got to plan carefully. The kits themselves don’t carry power or data, so your smart devices still need proper wiring or wireless connections. You’re just hiding the cables safely in the wall. Make sure you leave enough slack for hubs, adapters, or future upgrades. Some kits include low-voltage channels, which help organize Ethernet or speaker wires neatly and safely.
Do Any Kits Support Outdoor Wall Installations?
You’ll find most in-wall cable kits aren’t built for outdoor use-exposure to moisture and temperature swings can damage standard components. But a few weather-resistant models, like those with UV-stabilized PVC and IP66-rated junction boxes, do support outdoor installations. Just remember to seal all entry points and avoid direct burial unless specified. Always check the manufacturer’s warranty; outdoor use often voids it unless explicitly covered.
Will Paint Adhere to the Cover Plates?
Yes, paint adheres well to most cover plates, especially those made of ABS plastic or composite materials designed for finishing. You’ll get the best results with light sanding and a primer made for plastics. Avoid gloss finishes-they highlight seams. Matte or eggshell paints blend seamlessly. Test on a scrap piece first. Keep in mind, painted plates may show wear over time with frequent cable changes, so touch-ups could be needed for a lasting, clean look.
Are Replacement Parts Available for These Kits?
Yes, you can get replacement parts for most in-wall cable management kits. Manufacturers like Wiremold and Legrand offer covers, plates, and brackets separately, so you won’t need to replace the whole unit if something breaks. Just check the model number-parts aren’t always cross-compatible. Keep in mind, availability varies by brand and region, and discontinued models may pose challenges. You’ll typically find them on the maker’s site or through authorized retailers.